Top 10 Tips
from Professional Photographers
Photography has never been more fun! With the automation of today's 35mm cameras, taking a great picture can be as easy as pointing your camera and pressing the shutter release.
These 10 simple tips are ones routinely used by professional photographers. But, the basic "rules" of composition will work just as well for anybody who wants to take better pictures. While these pointers apply specifically to adjustable cameras, many can be used with even basic point-and-shoot models.
Feel free to experiment and try new picture-taking techniques. Should you ever have any questions, be sure to call our Customer Service Department at 800-327-1776.
We have a full staff of experts and we're here to help!
1. Get Close to Your Subjects...Especially With "People" Shots
You'll be amazed at how much impact your pictures will gain when you fill your frame with your primary subjects. By eliminating outside "trivia," you'll get much more dramatic, interesting pictures. You'll also minimize the "red eye" which is often caused when the telephoto setting on point-and-shoot cameras is used to take flash pictures from too great a distance.
2. Use a Faster Shutter Speed
Blurred images are more often the result of camera movement than poor focus. The trick is to use a high enough shutter speed to stop both camera motion and your subject's movements.
The rule of thumb is that the minimum shutter speed you should use is approximately twice the focal length of your lens. Although this may sound complicated, it's really not. With a 50mm lens, the minimum speed setting for your adjustable camera would be 1/100th of a second. Since that speed is not available, use 1/125th of a second. If you have a 200mm telephoto, double that to 1/400th (or in real camera settings, 1/500th of a second). For automatic programmable cameras, use shutter priority. If you can't adjust your camera's speed, simply try to hold your camera as steady as possible.
3. Use Fill-in Flash Outdoors
Many 35mm cameras and flash units are now equipped with automatic fill-in flash. By using this feature, you'll selectively lighten the shadows that form when you take pictures in bright sunlight. And you'll get more natural-looking outdoor shots.
Fill-in flash is especially effective with pictures of people. It's really very easy to get professional-looking shots. Just turn on the fill-in flash and your camera will make the necessary computations automatically. (Check your camera's instruction manual for specifics.)
4. Use Flash Indoors
A lot of people try to take "candid" photos indoors without using a flash. This is usually a big mistake. Color film is balanced for use with either daylight or flash. Shooting without a flash will result in yellowish pictures under incandescent lighting or greenish photos if taken under fluorescent light. Since most flash units are automatic (and often built into thecamera), there's rarely a good reason not to use them for "people" shots. The main exceptions would be when you are beyond the range of your flash, at sporting events, or in theatres (where flash is prohibited).
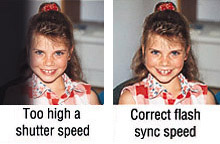
5. Watch Your Flash Sync Speed
One of the most common mistakes people make is to use a shutter speed that is higher than their camera's flash synchronization speed. This results in part of the image being blacked out by the focal plane shutter.
The maximum sync speed your camera can handle will probably be shown on the camera's shutter speed indicator. Any slower speed may be used. Just be careful to avoid using speeds below 1/60th of a second because you may get blurs due to camera movement.
6. The Rule of Thirds
Would you like to win a photo contest and really improve your compositions? Here's the "trick" that wins more contests than any other:
When you compose your pictures, try to break the visual "elements" into thirds, either horizontally, vertically or both.
This photograph shows how the rule of thirds works. Notice how the sky fills the top third of the picture. The mountains take up the center third and the water the bottom third. The photo also demonstrates the rule horizontally. The building fills the left third of the photo, with the sailboat filling the right third.
When you only have two elements (sea and sky, for example), let one element take up 2/3 of the frame. You'll be amazed at the impact "the rule of thirds" will bring to your photographs. Can anything this simple really work? An 8"x12" enlargement of this composition won Dale and his wife a free Caribbean cruise, compliments of Windstar Cruise Line's photo contest!
7. Use Lens "Distortion" Creatively
Photographs are two-dimensional images that try to approximate a three-dimensional world. You can give your pictures more depth and impact by using wide angle lenses that emphasize perspective. Or, you can use telephoto lenses to bring objects together, minimizing perspective.
A 24mm wide angle lens gave great depth of field and increased the apparent size of the statue in the foreground.
A 200mm telephoto lens caused these sailboats to look much closer together, for a "tighter" composition.
8. Exposure Tricks
You can decrease visible grain and increase the apparent sharpness of color print films like Kodacolor, Fujicolor, 9100 or 9400 by setting your camera to overexpose by 1/3 to 1/2 stop. The reason this "trick" works is that all modern color films have two distinct layers of grains for each color recording layer - a fairly coarse, but very sensitive high speed grain and a finer, slow speed grain.
When you overexpose, you activate more of the fine grains which "fill in" the spaces between the coarser grains. The result is a sharper, more grain-free picture. Most 35mm SLR cameras have a means of setting an exposure bias.
If you are using a slide film like Ektachrome or Fujichrome, you should not overexpose. Run an exposure test of your camera's metering system with your favorite "chrome" film. Take a bracketed exposure series starting with no exposure bias and then underexpose in 1/3 stop increments (-.3, -.6, -.9, etc.). Examine the resulting slides to see which is best.
9. Try Unusual Lighting Effects
Film records the color of the light that exposes it. That light might be coming from a subject...or it might be reflected by the subject. Even though your eye sees artificial light as "white," color film will see it in very unusual ways. So, "non-standard" lighting can give you some very dramatic effects.
You'll also get great shots by using the natural light occurring just after sunrise or before and during sunset. These are the "golden hours." Take scenics by sunset and you'll understand why the pros call this light "golden".
The photograph, shown to the left, takes advantage of two "non-standard" light sources; the sunset behind the ship and the fluorescent light from the pool.
10. Odds and Ends
Smart professionals know you can't take a top quality picture through a dirty lens. It may seem obvious, but cleaning each of your lenses before every "shoot" will assure you of the sharpest shots and most saturated color. We suggest breathing on the lens surface and then using a Kodak lens cleaning tissue to wipe off the mist.
The Rule of 16 - Here's a good way to check your camera's meter for accuracy...or make a reasonable guess of exposure in case of battery failure. The correct exposure for a normal sunlit day will be f/16 with the shutter speed being approximately equal to the ISO of the film. For ISO 100 film, for example, the correct setting for average, open sunlight would be f/16 at 1/125th of a second. For ISO 400 film, you would use f/16 at 1/500th of a second. On the beach, where you have reflected light, you should close down one stop (or increase the shutter speed). On a cloudy day, open up a stop or two.
Which Film Should You Use?
Choose film with the right speed for your subject. For general photography, ISO 100 or 200 film is ideal. If you're shooting under low light or trying to record action, ISO 400 is usually the best choice.
People often choose the faster, ISO 400 emulsions so they can use higher shutter speeds for sharper pictures. The 400 speed films are also great for point-and-shoot cameras.
We can process any brand of film. Kodak, Fuji and Agfa all make outstanding films. Each has its own distinctive qualities. Our equipment is balanced to give the best possible quality from every film. Which brand is best? We like Kodak films for their natural color rendition. For a combination of beautiful color and low price, our 9100 and 9400 are excellent choices. Whatever film you select, we'll give you prints, slides and enlargements you'll be proud to show!
For interesting facts about Dale Laboratories... Click here.