Dale Photography Laboratories, Hollywood, Florida

Home![]() About Us
About Us![]() Prices
Prices![]() FAQ
FAQ![]() Privacy
Privacy![]() Photo Credits
Photo Credits![]() Solutions
Solutions![]() Contact
Contact
This easy-to-use calibration chart will allow you to use the adjustments on your monitor to adjust your screen brightness, contrast and color so that the images you see on your screen will be a closer color match to our laboratory's photographic prints.
Just follow the directions below and you should be able to get a good monitor calibration in minutes!
Note: If your monitor does not have all the three controls (brightness, contrast and hue/color temperature) please use the controls you do have to achieve the best possible balance.
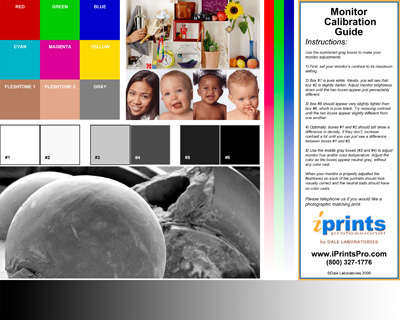
Instructions:
Use the numbered gray boxes to make your monitor adjustments.
1) Set your monitor's contrast to its maximum setting.
2) Box #1 is pure white. Ideally, you will see that box #2 is slightly darker. Adjust monitor brightness down until the two boxes appear just perceptably different.
3) Box #5 should appear very slightly lighter than box #6, which is pure black. Try reducing the contrast until the two boxes appear slightly different from one another.
4) Optimally, boxes #1 and #2 should still show a difference in density. If they don't, increase your monitor's contrast a bit until you can just see a difference between boxes #1 and #2.
5) Use the middle gray boxes (#3 and #4) to adjust monitor hue and/or color temperature. Adjust the color so the boxes appear neutral gray, without any color cast.
When your monitor is properly adjusted the fleshtones on each of the portraits should look visually correct and the neutral balls should have no color casts.
Please telephone us at (800) 327-1776 if you would like a photographic matching print.